Wednesday, October 28, 2020

Those Are The Brakes

A couple of weeks ago, I got in Gidget to go to the gym.  I noticed something on the floor mat... which happened to be brake fluid.

It looks like the rebuilt master cylinder started failing.  I didn't lose much--just a couple of capfuls--but it was enough to trash the paint on the entire pedal box assembly.  I also noticed a slight leak at the clutch slave cylinder, which was new at the time but didn't hold up.

So out came the box, master and slave.  I cleaned and repainted the box and pedals, and reassembled them.  I replaced the master with a new unit this time, but I saved the old unit as it's a) rebuildable and b) an original Lockheed.

Everything went back in well, and once bled I have a nice and firm pedal for both brake and clutch.  I did notice a small weep around the clutch pipe fitting, but hopefully I've solved that too.

I also took the opportunity to swap out the rotors and pads with new cross-drilled and vented units.  They look nice and work well.  Unfortunately, they still squeal...

More... »

Wednesday, September 30, 2020

Squeaky Squeaky Engine Mice

I finally got everything back together, and it's wonderful.  I cleared up my driveshaft rubbing by popping the driveshaft out, removing the seal, cutting it down and reinstalling everything.  No more rubbing noises.

I put about 100 miles on the conversion, and all seemed well until the engine developed a 'squeak' that I had never heard before.  It was coming from the area of the valve train, which seemed impossible... until I pulled the valve cover and found two things:

  1. The squeak was definitely from that area.
  2. There was no oil being tossed about.
The second one is what really concerned me.  Normally, there should be a little bit of oil being expelled from the rocker shaft to lubricate the rocker arm bearings.  This was not happening.

After asking around a bit, one of the questions I got was whether I was sure I had assembled the rocker assembly properly.  I thought I had, but it was the easiest thing to check.  So I pulled it apart.  Everything seemed right--the oil inlet hole was in the right spot--but when I tried to blow some air through the assembly (to see what came out), I got... nothing.

Um.

This means that I had been driving for about 3100 miles without any oil at the top end of the engine.

At least I had something to diagnose.  I pulled apart the rocker assembly on the bench, and sure enough... I had put the rocker shaft backwards so the oil hole was at the back, not the front of the engine.

It was this:


It should have been this:


Th oil hole is the second one from the right in the bottom picture.  That's what lets oil into the rocker shaft and out to the rocker bearings.

Easy enough to fix.  I reassembled the shaft (properly) and reinstalled.  At startup, no more squeaks and I see a little bit of oil puddling around the valves.

I'm very fortunate that the wear in these is minimal.  I couldn't feel any appreciable wear when running my thumbnail along the shaft.  So I think I dodged a bullet.

Now I just need a recalibrated speedometer drive adapter.  My reading is off by about 10%.  In the meantime, I can drive!

More... »

Saturday, August 22, 2020

Around the Block in 5th Gear

I took a crawl around the block this week.  Sooooo close!

I solved my cooling leak, which was just the hose fitting at the radiator not sealing because of the line for the thermostatic bulb.  I moved it to the side at the thermostat, and it sealed up.  I pulled the radiator and relocated the fan, and no more bad noises there either.

I disconnected and bypassed the oil cooler to see if it would help my cooling concern, and it didn't.  I think it's just a factor of it being 110 degrees F.  I'll hook up the oil cooler again.

I managed to bleed the clutch, and after adjustment I have what seems to be a good pedal with engagement about halfway to the floor.  The pedal is a bit heavier, but that's ok.

I also modified the shift lever to be the right length and offset, and it fits about in the center of the shifter cover.  It looks almost stock.

So I crawled around the block, and huzzah!  Everything works.  I get all five gears and I can back up.  The speedo works and appears to be reading right.  But I have one disappointing issue... the driveshaft yoke is just barely rubbing on the shroud over the rear transmission oil seal when I go over some bumps, which shifts the yoke forward just enough.  So I'm going to have to figure out how to get in there and modify the shroud to work.  I think I can do it--the shroud plus seal will pop out, if I disconnect the driveshaft and move it out of the way.

Maybe one more week, and I'm back on the road!
More... »

Tuesday, August 18, 2020

She Lives Again

Gidget's heart beats once again!

After installing the aluminum radiator (which was not a simple ordeal, let me tell you) and a longer starter cable, and filling the gearbox, I hooked up the battery and turned the key.  I got a couple of puffs, and on the second attempt she fired up with a little choke.  Oil pressure is good and there are no funny noises.


All is not quite sunny in Philadelphia, though.  I have a coolant leak at the top radiator hose fitting, which I believe is just the way the electric fan sender is installed in the hose.  There are no leaks until coolant starts to circulate under pressure.  I also have a problem with the electric fan being mounted too low, which has the housing pushed up against the crossmember and the blades are glancing off the housing, making a lovely racket.  So the radiator has to come out for me to relocate the fan.

I also was not impressed with the cooling capability of this radiator.  The temp climbed to over 200F, even with the electric fan running.  I suspect a combination of it being almost 110F outside and a need to get the fan running at full speed.  I may reinstall the original fan for a little extra oomph.

So, once I sort that and bleed the clutch, it will be time to crawl around the block and test out this new transmission!

More... »

Saturday, August 8, 2020

The Eaglet Has Landed

I finally have the engine and five-speed in the car.  The actual installation of the engine wasn't too bad, but the transmission mount was a real bear.

I did a good amount of preparation to ensure the transmission would fit by test-fitting the transmission and mount, so I knew it would actually work.  I've got a shop crane and load leveler.  Should be simple, right?  Well, almost...


The only real difficulty was in the last little bit, where the crankshaft pulley rubbed against the front crossmember.  My 'clearancing' of the heater box wasn't quite enough, but I was hesitant to do any more because I was at risk of distorting the box.  A little finagling made it all work out.  I even preinstalled the driveshaft so I wouldn't have to struggle later on.  I installed the front motor mounts (loosely), and everything looked good for the moment.

The last item to install was the bottom half of the rear transmission mount.  The instructions said to just 'install it'.  That... didn't quite happen.

The mount comes in two parts so that there is enough room for the back half of the transmission to fit into the tunnel during installation.  The bottom half is supposed to slip into place after jacking up the back of the transmission.  I found that there was not enough clearance because the rubber mount wouldn't clear the transmission.  I ended up having to carve a hunk out of the rubber portion of the mount, and about 1/8" of the metal portion of the mount.  I moved the engine forward as far as I could (about 1/2"), and then was able to pry the mount into place.  That only took two hours... but once there, the mount lined up exactly right and the bolts bolted up.  Nice.


That was enough for the day.  It was quite hot out and I ended up overheating a bit, so I took the rest of the day off after putting everything away.

Next time--I start bolting stuff back on, and hopefully get close to a (second) first start.
More... »

Sunday, July 12, 2020

Test Fit The Tranny

Before going whole hog and trying to put the engine/transmission in the car, I thought it best to do a test fit.  Fortunately, no problems were found.

This wasn't too bad.  I maneuvered the transmission into the car (that part was not fun--it's 50 pounds and awkward) and verified that the custom transmission mount would line up.  It does.  I had to 'clearance' the heater box a little, but it's not visible.


The hardest part was recreating the clutch slave cylinder line.  I decided to stick with the original slave cylinder, which meant the hard line had to be shortened and rerouted to the other side of the transmission.  That took a couple of hours, but the results look pretty good.


Now that everything fits, it's time to put it all together.
More... »

Sunday, June 28, 2020

Engine (Re)assembly

I hope the second time is the charm with my engine.  I've got everything back together and I think she's about ready to be mated with the five speed.

I installed the new piston rings and rod bearings and got the pistons in place.  I ended up buying a new piston ring compressor as the one I have wouldn't cinch up well (probably from being compressed in the drawer for too long).  I measured all the gaps at .008-.009", right on target.  It was a struggle, but everything did go together properly.  With the pistons installed and the rod caps torqued down, things are tight but turn smoothly.


Then it was on with the sump cover and oil pickup, install and torque down the head and do a cold set of the rocker clearances, and all done.


I still have to relocate the clutch slave cylinder and measure clearances as recommended by the install guide. To do the latter, I have to bring the hoist into play and mount the flywheel and clutch.  There are specific tolerances for the clutch and throwout bearing to work together.  Then the starter goes on, the trans mates to the engine, and the whole thing goes in the car.  Exciting times are ahead!
More... »

Sunday, June 7, 2020

Installing the Rear Plate

While I waited for parts, I tackled the next step in preparing for the conversion: installing the rear engine plate.

This wasn't hard.  The custom machined plate that comes with the Rivergate kit both fits well and looks good, with all required hardware provided.  It also comes with a custom rear main seal mount.

The first step is to install the oil pump cover.  This has to be sealed with silicone, and must be flush to ensure the plate fits properly.  The instructions suggest using a heavy weight, but in my case it was easier to just clamp the cover in place after ensuring it was flush by using a straightedge.


Once that's done, the rear of the block was cleaned and silicone sealant (handily provided in the kit) applied in a thin layer in place of the gasket and where the oil pump cover seals to the block.  Apparently, the gaskets add too much variation in thickness and ironically can cause leaks in this setup.  Once applied, the plate is installed and tightened with the supplied bolts.


Finally, the rear seal was installed by filling any gaps between the plate and the block with silicone, running a thin bead of silicone around and between the bolt holes, and installing the mount.  The seal has lithium grease applied to provide for lubrication.


And that's it.

With the rear plate installed, I moved the assembly to the engine stand in preparation for final assembly.  I'm waiting on rings, and afterward I found I am on an enforced vacation from car things due to some elbow problems.

More... »

Pressing F5

In the computer world, F5 means 'refresh'.  After pulling the engine out of Gidget, I figured I should take a quick look inside both to find that oil leak and see how the engine was holding up.

I'm glad I did.  I had problems.

First, I had a head gasket failure-in-progress between cylinders 2 and 3.  I could see the gray crusty residue of coolant being burned. It turns out the brass plug between 2 and 3 had receded enough to open the gap.  So a trip to the machine shop (Morrison Auto Machine, awesome!) fixed things right up by threading a new brass plug into the head and planing it off flush.


I also had lots of carbon buildup in all cylinders, and it wasn't until I pulled the head apart that I found out why.  This is embarrassing to write, but I had installed the oil seals on the exhaust valves and not the intake valves, so it was just sucking oil into the cylinders.  I hadn't noticed significant oil consumption, but I did see a couple of puffs of smoke every so often... now I see why they were happening.

The valves and guides are in fine shape after a bit of wire brush to remove the carbon.

After all that, I now have a rebuilt cylinder head with properly installed Viton valve stem seals on the intake valves.  I left the seals on the exhaust too--while not absolutely required, I have not found anything that says it is bad to leave them.  And if they degrade, no big deal.

With the cylinder head sorted, I looked over the remainder of the engine.  I mean, why not?  It's apart... and I had to pull the rear plate and rear main seal (Gerard's) to install the Rivergate plate.  Again, I am glad I did... I had some less-serious problems.

I pulled the pistons and rods.  The bearings were worn more than I liked, but the journals were clean.  These were the bi-metal bearings.  I have tri-metal King bearings to Vandervell specs waiting to go in.  The main bearings looked pretty good, but I replaced them (again, tri-metal) since it's a "false economy" to leave them alone.

The camshaft didn't turn smoothly, either.  I had noticed this when I first assembled the engine, and got things lined up pretty well.  It seems that the middle bearing was eating itself up.  These were 'split' bearings, which apparently weren't honed for fit.  The camshaft itself is fine; the bearing surfaces are clean and none of the lobes show unusual wear, all specing out within .001" of each other.  Dan took care of the bearing problem for me by sourcing 'solid' bearings and installing them, and checking the fit.  The cam now turns smoothly and easily.  I replaced the lifters with lighter ones that have an oiling hole as I wanted to eliminate any possibility that the lifters were the cause of my tapping noise.  Everything is clean, smooth and moves easily.

The rest looked ok.  The cylinder bores were not worn, so they got a light hone to allow the new piston rings I have on order to seat properly.  The block is clean inside and there's no metal residue in the pan.

I could not trace down the root cause of my oil leak, though.  Everything seemed tight, though there was a light trace of oil at the oil pump cover (but not enough to cause me to suspect it).  The rear main seal was clean with no signs of a leak.  I suppose it is possible that a slight gap at the cover could have pushed a little oil out, but that was a lot of oil I saw under the car after a short run.  Something was pushing it out under pressure.  Maybe the seal at the block side of the rear main was faulty, but I don't think so.  Anyhow, it will all get sealed up tightly again when I install the new rear plate.  Since I am converting to the Rivergate seal, I installed the original rear scroll seal cap with a new gasket and a light coat of silicone sealant.

Having gotten the block back from Morrison Auto, I installed the crank, lifters, cam, and oil pump.  I had the rotating assembly balanced, and it was indeed a bit off, which could explain the light vibration at 3500RPM.  The pistons and rod assemblies were all within a few grams.

The front plate, timing gears, oil thrower and timing cover went back on with new gaskets (that I happened to have, thankfully).  I checked the timing cover for straightness and made it nice and flat.  I installed a new front seal as well, though the one that was there was still ok.  Finally, the water pump went on with a new gasket.  Everything is nice and clean and properly torqued.

This is apparently a 'refresh', though to me it's a 'rebuild' since I replaced pretty much everything.


I also made new timing marks at a location that I could actually get to with a timing light.  It's accurate enough.  I didn't need all the marks, but it was simple to do.


I'll get this back on the stand (it's all I can do to deadlift it off the bench as it is) and install the pistons with new rings and bearings, and the head.  Then it's on to what I originally set out to do--install the new transmission!
More... »

Saturday, May 16, 2020

A (Not Too) Painful Extraction

A friend of mine came over and gave me a hand pulling the engine and transmission out of Gidget.  Thanks, Dave!

This wasn't actually that bad.  The part that hurt the most was draining $30 of MT-90 from the transmission, that looked brand new.  There was a little bit of collateral damage, but nothing that a bit of paint can't clear up.

I bought a shop crane and leveler, which made the job much easier.  I had to jack up the front of the car since the crane wouldn't fit under the front spoiler--it was much less painful to jack things up than to remove the spoiler.  I didn't need to jack it up as far as I did, so I'll find an alternate for when I reinstall everything.

Anyhow, here's the result...


While I have the engine out, I am going to go through it and check how everything's wearing.  I hear a tapping noise when things warm up--I am hoping it is nothing serious, but this is definitely the opportunity to look things over.  I also want to figure out where my oil leak is coming from--initial examination suggests the rear main oil seal kit I installed may have failed, but the evidence is very circumstantial.  I need to get the block up on the bench to really check it out.

I'm also going to take advantage of the gaping hole in the engine bay to clean everything thoroughly.  It is amazing how just two years accumulated such crud.  Not that it's bad--but still.  I like things clean, and after everything I went though I think she deserves it.

More... »

Sunday, April 26, 2020

Five Speed Rebuild, Part IV: Putting It Back Together

Having torn the transmission apart, I think it might be a good idea to put it back together.

Before I started, I had a couple of modifications to make to the bellhousing:

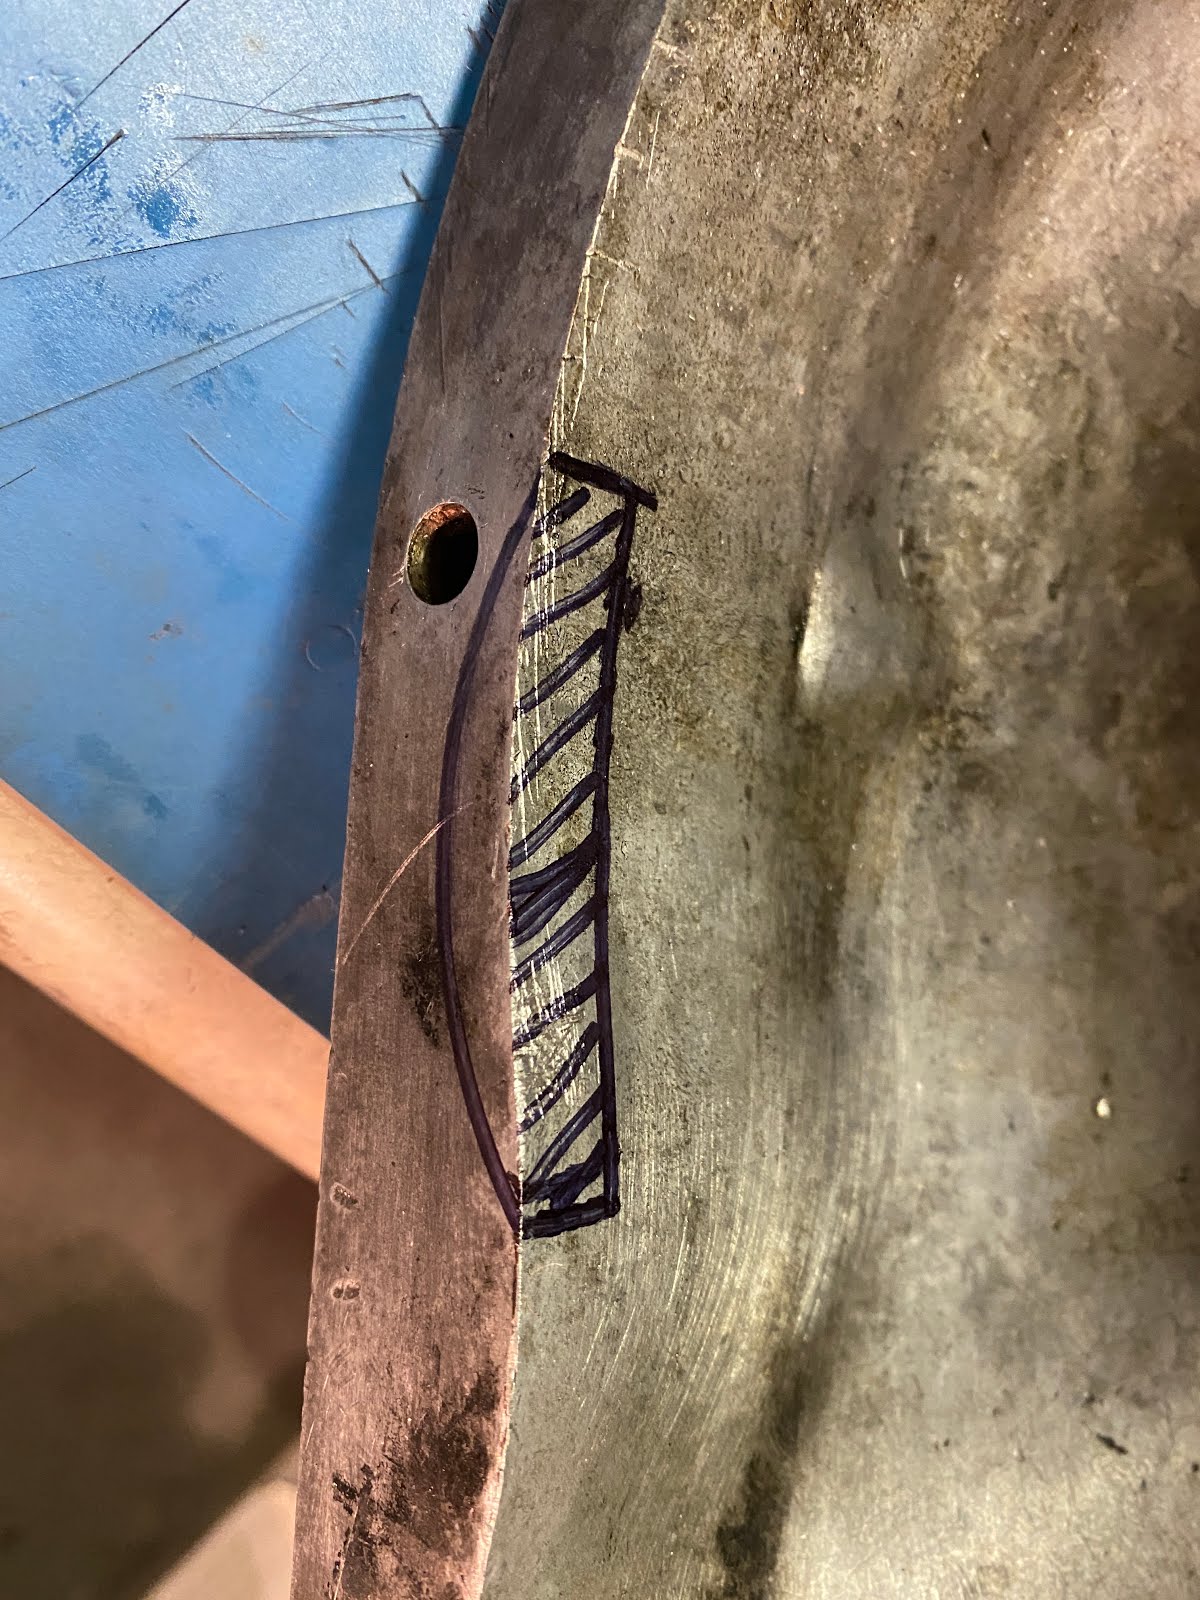
  1. Notch, tap and drill the mount for the hydraulic slave cylinder;
  2. Make a notch for the oil pump cover.
For the slave cylinder, this required both cutting a notch in the housing, and tapping and drilling two bolts to hold it in place.

Like this:


The bolts that were supplied in the kit were intended to thread into a previously configured transmission, and were M12x1.50 (metric).  I didn't have a tap in that size, so I went and got some 3/8"x16 bolts and tapped for those instead.  You'd never know.

Next I cut out the notch for the oil pump housing... and made a little mistake.


The case wasn't quite thick enough, I guess.  But it's not required to be sealed, so a little aluminum epoxy will make it go away.

On to the gear train!  Note that everything in this post goes back together with assembly lube so nothing starts up 'dry'.

Here's some new parts with old parts:


The first thing I did was easy: refit the bearing to the input shaft.


The next task was to reassemble the main shaft "in reverse order of disassembly".  First 2nd gear, then the 1/2 synchro, then 1st gear, then the bearing.  I took a picture of one side of the 1/2 synchro to show that it is easier to install the synchro and then the gear, because there are teeth that the synchro has to align with to seat properly.


This was trickier than I expected... when I first reassembled the synchro onto the mainshaft, I could not get the synchro to move freely between 2nd and 1st.  It would bind up.  I eventually decided to put the original retaining springs back, which means disassembling the work I had done... which becomes a common theme throughout the rest of this post.  Anyhow, the second time was the charm.

Then flip the assembly and install 3rd gear and the 3/4 synchro.  4th gear is on the input shaft (it is the input shaft), so the synchronizer is held in place with a circlip.

   
And that's the mainshaft back together.

The fun part begins with installing the mainshaft and the counter shaft into the carrier plate.  I remounted the plate to my adapter plate KV32100300 / 2x4 and got started.

The first job is to reinsert the reverse idler gear.  This taps back in at a specific orientation so as to clear the large gear on the counter shaft, and is held in place by a washer and circlip.  It was easier to tap out the shaft with the gear attached, so it went back together the same way.  I just cleaned it really well to get rid of the ATF.  Doing it this way means you have to pay attention to the location of the thrust washer behind the gear--it has a tab that fits into a slot in the carrier plate.


The next job is to fit the main and counter gear trains into the plate on their bearings. The mainshaft gets its retaining circlip installed.


The astute observer will notice something missing.  I didn't notice it until the very end... I'll tell you later, but man, it hurt when I did.  It looks pretty, though.

Moving on... on go the mainshaft bearing retaining plate, smaller counter gear, mainshaft spacer and the needle bearing for reverse gear, followed by the reverse gear and the R/5 synchro, and then 5th gear (or 'overdrive'). The synchro is also held in place with a circlip.  The bearing plate is 'staked' in place to keep the bolts from backing out.


The next step is to install the counter gear, followed by the little ball bearing and spacer that you cannot, cannot lose like I almost did.  Then there's a split thrust washer and a retainer that is held in with a circlip.  (I forgot the circlip the first time--good thing I had a second chance, as you will discovery why shortly.)


The result looks pretty good!


The only thing left is the smaller mainshaft bearing, held in position by two circlips.  For some reason, I didn't take a picture of those when I installed them, but it's simple and didn't require more than light tapping to get it in position.  I did muck about a bit to get the circlips in the right spots--they are slightly different thickness and will really only fit one way.

All that's left is to install the shift forks.  The first and most important thing is to insert the oblong detent balls that fit between the shafts.  Without those, you'll end up shifting into two gears at once and that's all she wrote.


The shift forks themselves get placed in position, followed by insertion of the fork shafts.  Two of the shift fork shafts have circlips to act as stops when shifting, so those have to go on when the shafts are inserted.  Once they're in place, they get pinned in place.  Finally, the outer detent balls, springs and retainers are fitted.


Here's where that mistake I mentioned earlier came to light.  I thought the last thing I'd have to do was to fit the input shaft and be ready to assemble to the case.  But... the input shaft with 4th gear has to go on before installing the counter gear shaft, because it won't slip around the counter shaft gear.  In the picture above, you can see the input shaft in place and how its gear meshes with the counter gear.  But to fix this, I had to disassemble the entire assembly and remove the main and counter gear trains to fit the input shaft.  So I got to take it all apart, and put it all back together again with the input shaft in proper position.

This was not fun--as I tore it back down, the 3/4 synchro came apart and I spent 20 minutes looking for all the pieces on my garage floor.  Thankfully, I found them all.  Then it happened again.  I was supremely fortunate to find all the parts one more time.  It was also good I tore it back down because I realized I had forgotten the circlip that held the R/5 synchro in place.

Then, while refitting the shift forks I lost one of the circlips that act as a stop for the shift action.  That was another 1/2 hour of searching.  I almost gave up for the night, but figured if I didn't finish I would forget where I was in assembly and never get it right.  Once again, fortune favored the foolish and I found the circlip, and finished reassembly into the picture you see above.

Lesson learned--look at the manual as well as the pictures you take during teardown.

The next day, I was able to spend time happily refitting the gear train into the case.  "This will be simple," I recall thinking... Wrong.  It wasn't that hard once I figured out the problem I had, and once again a good read would have saved an hour of labor.

The first step is to reintroduce the gear assembly and the bellhousing.  "Hi."


Apply a sealant to the bellhousing and the carrier plate, then fit the gear train into the bellhousing.  The gear train drops in with little effort. I noticed a little gap, but figured it would close up once I tightened everything down.  It did, but not in the way I wanted.  I'll explain in a bit.


The last major assembly step is to fit the rear extension with some sealant.  The Haynes manual and I disagree on how to do this easily.  The manual states that you shift the box into 5th gear, then rotate the selector linkage clockwise, and rotate it counterclockwise as you fit the extension so the 'striking rod' (the part the fits into the linkage) engages.  That. Did. Not. Work.  I found that the simpler method is to leave the box in neutral, pop the striking guide (the part around the shaft that holds the shift lever) up to gain clearance, and lower the rear extension while fiddling with the shift rod until you feel it slip into place and can rotate it back and forth freely.  The rear extension then fits into place without fuss.  it takes a little practice, and unfortunately I got more than I wanted.

EDIT: I got a hold of the Datsun manual, and its rear extension installation procedure is exactly what I describe above.  Great minds think alike.

The first time I assembled everything, it looked great.  I could shift without any problems.  I bolted the transmission together, went to turn the input shaft as a test... and it was locked up tight.  When I loosened the bolts, things turned again.  I figured I had misaligned the extension, so off it came (and the sealant cleaned off too).  The second time things went together, I had the same problem.  I decided the issue must be with the bellhousing, so everything came out once more... and I discovered the problem.  The thrust washer that rides on the counter shaft has a tab where it fits into the bellhousing, and the tab was not in the slot that holds it in place.  That's where that gap I mentioned earlier came from!  Fixing that problem meant the gear train fit perfectly, and fitting the rear extension (I got pretty good at it by this point) was a breeze.  I sealed and bolted everything together and all was well.  I could shift through all gears, and everything rotated freely.

Here's that bugger of a thrust washer that caused my problem.


I essentially took this transmission apart twice to put it together once.  I'm an expert now.

Some of the last last steps are to fit the striking guide retaining bolt, speedo drive and reverse light switch.  I don't have reverse lights, but it has to be there to seal up the case.

The last step is to fit the front plate (with its shim), release bearing arm with a nice new dust boot and the release bearing.  I got a new bearing with the rebuild kit; it pressed off and on to its carrier pretty easily.  The spring is installed first, followed by the lever arm and release bearing assembly, with the spring levered onto tabs on the release bearing carrier.


And that's it!


See, that wasn't so hard.

The important things to remember are:
  • Read the manual as well as look at pictures;
  • Don't lose any parts;
  • Have patience.
Now that I have a clean, freshly rebuilt transmission, the real job of installing begins...

More... »