Having torn the transmission apart, I think it might be a good idea to put it back together.
Before I started, I had a couple of modifications to make to the bellhousing:
Like this:


The bolts that were supplied in the kit were intended to thread into a previously configured transmission, and were M12x1.50 (metric). I didn't have a tap in that size, so I went and got some 3/8"x16 bolts and tapped for those instead. You'd never know.
Next I cut out the notch for the oil pump housing... and made a little mistake.


The case wasn't quite thick enough, I guess. But it's not required to be sealed, so a little aluminum epoxy will make it go away.
On to the gear train! Note that everything in this post goes back together with assembly lube so nothing starts up 'dry'.
Here's some new parts with old parts:


The first thing I did was easy: refit the bearing to the input shaft.

The next task was to reassemble the main shaft "in reverse order of disassembly". First 2nd gear, then the 1/2 synchro, then 1st gear, then the bearing. I took a picture of one side of the 1/2 synchro to show that it is easier to install the synchro and then the gear, because there are teeth that the synchro has to align with to seat properly.


This was trickier than I expected... when I first reassembled the synchro onto the mainshaft, I could not get the synchro to move freely between 2nd and 1st. It would bind up. I eventually decided to put the original retaining springs back, which means disassembling the work I had done... which becomes a common theme throughout the rest of this post. Anyhow, the second time was the charm.
Then flip the assembly and install 3rd gear and the 3/4 synchro. 4th gear is on the input shaft (it is the input shaft), so the synchronizer is held in place with a circlip.


 And that's the mainshaft back together.
The fun part begins with installing the mainshaft and the counter shaft into the carrier plate. I remounted the plate to my adapter plate KV32100300 / 2x4 and got started.
The first job is to reinsert the reverse idler gear. This taps back in at a specific orientation so as to clear the large gear on the counter shaft, and is held in place by a washer and circlip. It was easier to tap out the shaft with the gear attached, so it went back together the same way. I just cleaned it really well to get rid of the ATF. Doing it this way means you have to pay attention to the location of the thrust washer behind the gear--it has a tab that fits into a slot in the carrier plate.

The next job is to fit the main and counter gear trains into the plate on their bearings. The mainshaft gets its retaining circlip installed.

The astute observer will notice something missing. I didn't notice it until the very end... I'll tell you later, but man, it hurt when I did. It looks pretty, though.
Moving on... on go the mainshaft bearing retaining plate, smaller counter gear, mainshaft spacer and the needle bearing for reverse gear, followed by the reverse gear and the R/5 synchro, and then 5th gear (or 'overdrive'). The synchro is also held in place with a circlip. The bearing plate is 'staked' in place to keep the bolts from backing out.


The next step is to install the counter gear, followed by the little ball bearing and spacer that you cannot, cannot lose like I almost did. Then there's a split thrust washer and a retainer that is held in with a circlip. (I forgot the circlip the first time--good thing I had a second chance, as you will discovery why shortly.)


The result looks pretty good!

The only thing left is the smaller mainshaft bearing, held in position by two circlips. For some reason, I didn't take a picture of those when I installed them, but it's simple and didn't require more than light tapping to get it in position. I did muck about a bit to get the circlips in the right spots--they are slightly different thickness and will really only fit one way.
All that's left is to install the shift forks. The first and most important thing is to insert the oblong detent balls that fit between the shafts. Without those, you'll end up shifting into two gears at once and that's all she wrote.

The shift forks themselves get placed in position, followed by insertion of the fork shafts. Two of the shift fork shafts have circlips to act as stops when shifting, so those have to go on when the shafts are inserted. Once they're in place, they get pinned in place. Finally, the outer detent balls, springs and retainers are fitted.


Here's where that mistake I mentioned earlier came to light. I thought the last thing I'd have to do was to fit the input shaft and be ready to assemble to the case. But... the input shaft with 4th gear has to go on before installing the counter gear shaft, because it won't slip around the counter shaft gear. In the picture above, you can see the input shaft in place and how its gear meshes with the counter gear. But to fix this, I had to disassemble the entire assembly and remove the main and counter gear trains to fit the input shaft. So I got to take it all apart, and put it all back together again with the input shaft in proper position.
This was not fun--as I tore it back down, the 3/4 synchro came apart and I spent 20 minutes looking for all the pieces on my garage floor. Thankfully, I found them all. Then it happened again. I was supremely fortunate to find all the parts one more time. It was also good I tore it back down because I realized I had forgotten the circlip that held the R/5 synchro in place.
Then, while refitting the shift forks I lost one of the circlips that act as a stop for the shift action. That was another 1/2 hour of searching. I almost gave up for the night, but figured if I didn't finish I would forget where I was in assembly and never get it right. Once again, fortune favored the foolish and I found the circlip, and finished reassembly into the picture you see above.
Lesson learned--look at the manual as well as the pictures you take during teardown.
The next day, I was able to spend time happily refitting the gear train into the case. "This will be simple," I recall thinking... Wrong. It wasn't that hard once I figured out the problem I had, and once again a good read would have saved an hour of labor.
The first step is to reintroduce the gear assembly and the bellhousing. "Hi."

Apply a sealant to the bellhousing and the carrier plate, then fit the gear train into the bellhousing. The gear train drops in with little effort. I noticed a little gap, but figured it would close up once I tightened everything down. It did, but not in the way I wanted. I'll explain in a bit.

The last major assembly step is to fit the rear extension with some sealant. The Haynes manual and I disagree on how to do this easily. The manual states that you shift the box into 5th gear, then rotate the selector linkage clockwise, and rotate it counterclockwise as you fit the extension so the 'striking rod' (the part the fits into the linkage) engages. That. Did. Not. Work. I found that the simpler method is to leave the box in neutral, pop the striking guide (the part around the shaft that holds the shift lever) up to gain clearance, and lower the rear extension while fiddling with the shift rod until you feel it slip into place and can rotate it back and forth freely. The rear extension then fits into place without fuss. it takes a little practice, and unfortunately I got more than I wanted.
EDIT: I got a hold of the Datsun manual, and its rear extension installation procedure is exactly what I describe above. Great minds think alike.
The first time I assembled everything, it looked great. I could shift without any problems. I bolted the transmission together, went to turn the input shaft as a test... and it was locked up tight. When I loosened the bolts, things turned again. I figured I had misaligned the extension, so off it came (and the sealant cleaned off too). The second time things went together, I had the same problem. I decided the issue must be with the bellhousing, so everything came out once more... and I discovered the problem. The thrust washer that rides on the counter shaft has a tab where it fits into the bellhousing, and the tab was not in the slot that holds it in place. That's where that gap I mentioned earlier came from! Fixing that problem meant the gear train fit perfectly, and fitting the rear extension (I got pretty good at it by this point) was a breeze. I sealed and bolted everything together and all was well. I could shift through all gears, and everything rotated freely.
Here's that bugger of a thrust washer that caused my problem.

I essentially took this transmission apart twice to put it together once. I'm an expert now.
Some of the last last steps are to fit the striking guide retaining bolt, speedo drive and reverse light switch. I don't have reverse lights, but it has to be there to seal up the case.
The last step is to fit the front plate (with its shim), release bearing arm with a nice new dust boot and the release bearing. I got a new bearing with the rebuild kit; it pressed off and on to its carrier pretty easily. The spring is installed first, followed by the lever arm and release bearing assembly, with the spring levered onto tabs on the release bearing carrier.


And that's it!

See, that wasn't so hard.
The important things to remember are:
More... »
Before I started, I had a couple of modifications to make to the bellhousing:
- Notch, tap and drill the mount for the hydraulic slave cylinder;
- Make a notch for the oil pump cover.
Like this:


The bolts that were supplied in the kit were intended to thread into a previously configured transmission, and were M12x1.50 (metric). I didn't have a tap in that size, so I went and got some 3/8"x16 bolts and tapped for those instead. You'd never know.
Next I cut out the notch for the oil pump housing... and made a little mistake.
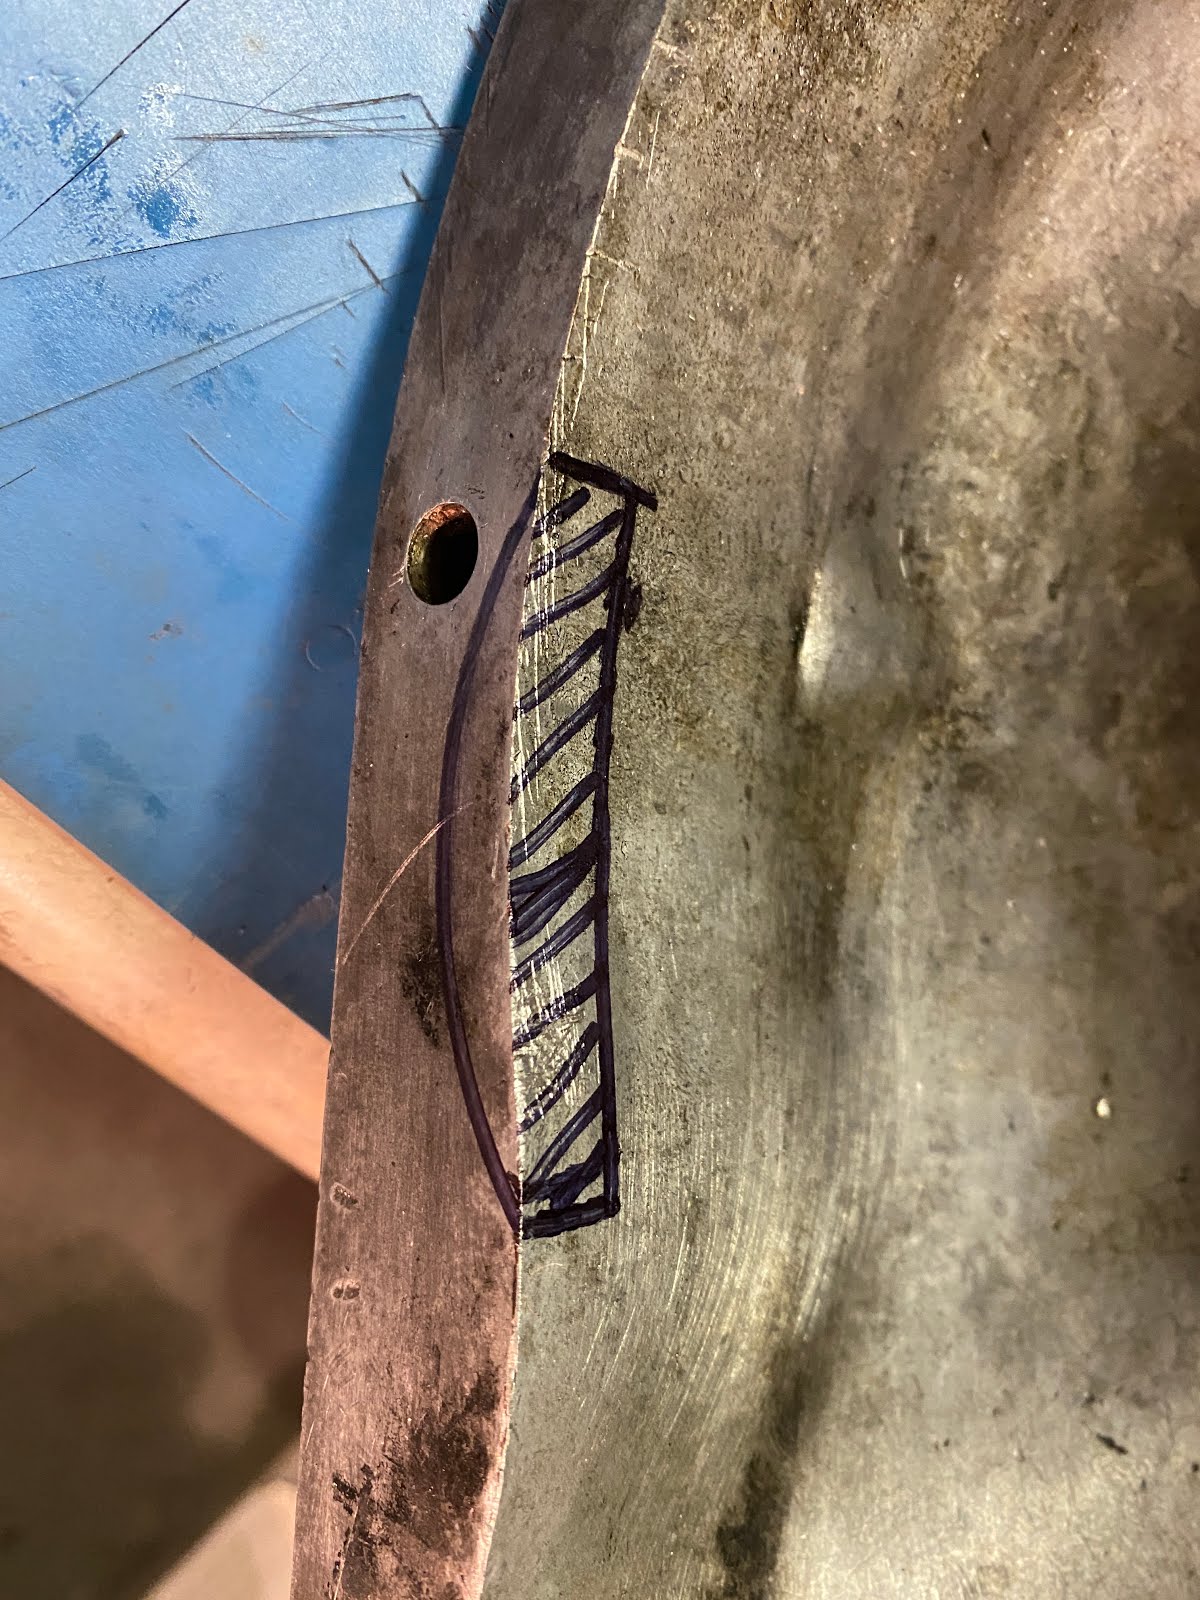

The case wasn't quite thick enough, I guess. But it's not required to be sealed, so a little aluminum epoxy will make it go away.
On to the gear train! Note that everything in this post goes back together with assembly lube so nothing starts up 'dry'.
Here's some new parts with old parts:


The first thing I did was easy: refit the bearing to the input shaft.

The next task was to reassemble the main shaft "in reverse order of disassembly". First 2nd gear, then the 1/2 synchro, then 1st gear, then the bearing. I took a picture of one side of the 1/2 synchro to show that it is easier to install the synchro and then the gear, because there are teeth that the synchro has to align with to seat properly.


This was trickier than I expected... when I first reassembled the synchro onto the mainshaft, I could not get the synchro to move freely between 2nd and 1st. It would bind up. I eventually decided to put the original retaining springs back, which means disassembling the work I had done... which becomes a common theme throughout the rest of this post. Anyhow, the second time was the charm.
Then flip the assembly and install 3rd gear and the 3/4 synchro. 4th gear is on the input shaft (it is the input shaft), so the synchronizer is held in place with a circlip.


The fun part begins with installing the mainshaft and the counter shaft into the carrier plate. I remounted the plate to my adapter plate KV32100300 / 2x4 and got started.
The first job is to reinsert the reverse idler gear. This taps back in at a specific orientation so as to clear the large gear on the counter shaft, and is held in place by a washer and circlip. It was easier to tap out the shaft with the gear attached, so it went back together the same way. I just cleaned it really well to get rid of the ATF. Doing it this way means you have to pay attention to the location of the thrust washer behind the gear--it has a tab that fits into a slot in the carrier plate.

The next job is to fit the main and counter gear trains into the plate on their bearings. The mainshaft gets its retaining circlip installed.

The astute observer will notice something missing. I didn't notice it until the very end... I'll tell you later, but man, it hurt when I did. It looks pretty, though.
Moving on... on go the mainshaft bearing retaining plate, smaller counter gear, mainshaft spacer and the needle bearing for reverse gear, followed by the reverse gear and the R/5 synchro, and then 5th gear (or 'overdrive'). The synchro is also held in place with a circlip. The bearing plate is 'staked' in place to keep the bolts from backing out.


The next step is to install the counter gear, followed by the little ball bearing and spacer that you cannot, cannot lose like I almost did. Then there's a split thrust washer and a retainer that is held in with a circlip. (I forgot the circlip the first time--good thing I had a second chance, as you will discovery why shortly.)


The result looks pretty good!

The only thing left is the smaller mainshaft bearing, held in position by two circlips. For some reason, I didn't take a picture of those when I installed them, but it's simple and didn't require more than light tapping to get it in position. I did muck about a bit to get the circlips in the right spots--they are slightly different thickness and will really only fit one way.
All that's left is to install the shift forks. The first and most important thing is to insert the oblong detent balls that fit between the shafts. Without those, you'll end up shifting into two gears at once and that's all she wrote.

The shift forks themselves get placed in position, followed by insertion of the fork shafts. Two of the shift fork shafts have circlips to act as stops when shifting, so those have to go on when the shafts are inserted. Once they're in place, they get pinned in place. Finally, the outer detent balls, springs and retainers are fitted.


Here's where that mistake I mentioned earlier came to light. I thought the last thing I'd have to do was to fit the input shaft and be ready to assemble to the case. But... the input shaft with 4th gear has to go on before installing the counter gear shaft, because it won't slip around the counter shaft gear. In the picture above, you can see the input shaft in place and how its gear meshes with the counter gear. But to fix this, I had to disassemble the entire assembly and remove the main and counter gear trains to fit the input shaft. So I got to take it all apart, and put it all back together again with the input shaft in proper position.
This was not fun--as I tore it back down, the 3/4 synchro came apart and I spent 20 minutes looking for all the pieces on my garage floor. Thankfully, I found them all. Then it happened again. I was supremely fortunate to find all the parts one more time. It was also good I tore it back down because I realized I had forgotten the circlip that held the R/5 synchro in place.
Then, while refitting the shift forks I lost one of the circlips that act as a stop for the shift action. That was another 1/2 hour of searching. I almost gave up for the night, but figured if I didn't finish I would forget where I was in assembly and never get it right. Once again, fortune favored the foolish and I found the circlip, and finished reassembly into the picture you see above.
Lesson learned--look at the manual as well as the pictures you take during teardown.
The next day, I was able to spend time happily refitting the gear train into the case. "This will be simple," I recall thinking... Wrong. It wasn't that hard once I figured out the problem I had, and once again a good read would have saved an hour of labor.
The first step is to reintroduce the gear assembly and the bellhousing. "Hi."

Apply a sealant to the bellhousing and the carrier plate, then fit the gear train into the bellhousing. The gear train drops in with little effort. I noticed a little gap, but figured it would close up once I tightened everything down. It did, but not in the way I wanted. I'll explain in a bit.

The last major assembly step is to fit the rear extension with some sealant. The Haynes manual and I disagree on how to do this easily. The manual states that you shift the box into 5th gear, then rotate the selector linkage clockwise, and rotate it counterclockwise as you fit the extension so the 'striking rod' (the part the fits into the linkage) engages. That. Did. Not. Work. I found that the simpler method is to leave the box in neutral, pop the striking guide (the part around the shaft that holds the shift lever) up to gain clearance, and lower the rear extension while fiddling with the shift rod until you feel it slip into place and can rotate it back and forth freely. The rear extension then fits into place without fuss. it takes a little practice, and unfortunately I got more than I wanted.
EDIT: I got a hold of the Datsun manual, and its rear extension installation procedure is exactly what I describe above. Great minds think alike.
The first time I assembled everything, it looked great. I could shift without any problems. I bolted the transmission together, went to turn the input shaft as a test... and it was locked up tight. When I loosened the bolts, things turned again. I figured I had misaligned the extension, so off it came (and the sealant cleaned off too). The second time things went together, I had the same problem. I decided the issue must be with the bellhousing, so everything came out once more... and I discovered the problem. The thrust washer that rides on the counter shaft has a tab where it fits into the bellhousing, and the tab was not in the slot that holds it in place. That's where that gap I mentioned earlier came from! Fixing that problem meant the gear train fit perfectly, and fitting the rear extension (I got pretty good at it by this point) was a breeze. I sealed and bolted everything together and all was well. I could shift through all gears, and everything rotated freely.
Here's that bugger of a thrust washer that caused my problem.

I essentially took this transmission apart twice to put it together once. I'm an expert now.
Some of the last last steps are to fit the striking guide retaining bolt, speedo drive and reverse light switch. I don't have reverse lights, but it has to be there to seal up the case.
The last step is to fit the front plate (with its shim), release bearing arm with a nice new dust boot and the release bearing. I got a new bearing with the rebuild kit; it pressed off and on to its carrier pretty easily. The spring is installed first, followed by the lever arm and release bearing assembly, with the spring levered onto tabs on the release bearing carrier.


And that's it!

See, that wasn't so hard.
The important things to remember are:
- Read the manual as well as look at pictures;
- Don't lose any parts;
- Have patience.
Now that I have a clean, freshly rebuilt transmission, the real job of installing begins...


